Tuesday, March 31, 2009

Countertops Installed

King's Marble and Granite came yesterday to install the countertops. I went with a quartz material (Caesarstone). They look fantastic!


The cabinet guys came today to install the corner cabinet and the ones to each side of that. I'll post those pictures soon.

Tuesday, March 24, 2009

First Tiling Complete... Telephone Hooked Up

Well, I'm glad I picked a room to practice in! The job is far from perfect. It's not that it's difficult to lay the tile. That is very easy. The hard part is getting the field to be perfectly square and regular.

I had watched videos on youtube and gone to the Home Depot class to prepare. Those were both good things to do. At Home Depot, the guy leading the demo saved me some money because I was planning to buy a more expensive tile saw than I needed. Instead of the $156 version, he lead me to the $88 version.


Even with the preparation, there's nothing like sitting down to do something yourself. Lessons learned by "doing":

  • Don't plan your layout to so close to the wall studs. I wasn't sure how far away I wanted to stay, and I wound up going too far under the bottom end of the sheetrock. It was ok for where I started, but the wall wasn't perfectly square (I guess). Even though my tile was in a straight line, it began butting against the 2x4 before long. Bottom line is that I didn't need to start out so close. The base moulding will come down and cover any gaps.
  • Popping a chaulk line helped only somewhat. It's supposed to help keep you in a straight line, but by the time you spread your thinset over even a small area, you're spilling over that line you laid for yourself and it's not as useful. Sure, you can still use the adjacent segment of the line that isn't covered to help you eyeball it. So it may be useful. Just not as useful as it sounded to me ahead of time.
  • You absolutely must stand up periodically, step back and get an overview of the field you are laying to make sure everything lines up. I thought I was doing a pretty good job (as good as I could anyway) keeping things in line from my viewpoint on the floor. I didn't want to keep getting up and back down because my knees were hurting already as it was. But occasionally when I had to get up, I could see where the earlier parts I had done weren't lining up. By then, that part of the floor had dried too much to fix it. It really would help to have someone else watching you and telling you where to adjust things.
  • Try to eliminate distractions once you start. If you have to answer a phone call or deal with anything else, parts of your floor are already drying and can't be fixed if you need it. It took two days to finish this small floor, and not just because I'm new at this. I had neighbors saying hello, and tools I had to go and find. We had to stop for hours and help the AT&T guy run the line up the utility pole!
  • Avoid using tile with anything but perfectly straight edges. I liked the way this tile looked with the wavy edges, but laying it with consistent spacing was not easy. The spots along the edge that I thought I could use for the spacers were close to the corners. This meant it was difficult for me to run my fingers across the corners to test the height of adjacent tile because I would always bump the spacers (and the tile!).

Like I said, the phone guy came to hook up the line. He came by himself, and my dad and I wound up helping him with a lot of stuff like running out wire, raising the PVC conduit up the pole for him, etc. But he was a good guy to talk to about their service. He ran a test for me to see how fast my web connection would be if I chose to get DSL service through them.

Saturday, March 21, 2009

First Tile in Place!

I started laying the tile on Friday for the bathroom that's in the rear garage. It's a good place to practice before going into the house. I've never laid tile before, and this particular room it getting tiles that don't have a straight edge. The edges are wavy, and it's going to be harder to get perfect spacing between them.

Monday, March 16, 2009

More Progress Today

It rained yesterday, so we turned our attention back inside to make sure the appliances fit in their spaces and run anything between cabinets that is best done before the countertops go in. This includes mostly the lines between the sink cabinet and the dishwasher. The plumber is set to come out tomorrow to make sure everything's in place.

Today, the alarm was installed. He had to re-work some of the zones we originally designed. There was one point where it looked like we had a short in a line or a broken circuit somewhere, but we found the problem and worked it out. So I'm secured with an alarm siren now.

We also put up the formica sheets as backsplashes behind all three utility sink locations. Finally, we took the temporary pole out of the ground today. The paver guys will return shortly to patch over that spot.

Saturday, March 14, 2009

I'm Still Here

I know it's been over a month since my last post. I haven't dropped off the face of the earth. Instead, I've been so busy with everything at the house that I've lost all spare time to blog about it!


So what's happened? My first FEMA certificate revealed that, not only was my front garage floor too low, but also the concrete pad for my A/C unit in the backyard. I knew about the garage, but the news about the A/C pad made me blow my top with the guy from the parish. That's because I had my A/C guy call his contacts at the parish to ask about height requirements before I built it. They had said there were none for my area.


So, after I had the A/C guy unhook the unit, my dad and I moved it and added 6 inches of concrete to the pad. Then I had it hooked up again.


As for the garage, I worked out a deal with the paver guy to use some spare bricks he had from another job to brick my garage floor. I had to pay the engineer $300 to come out and write me a letter saying the extra weight was ok in order for the Parish to accept the change. Then, of course, I had to pay $500 in labor to transport and lay the bricks.


After that, the surveyor measured again and all the heights were ok. Of course, the parish didn't bother to tell me the first time that it was a problem that the surveyor had labeled my back garage as an "accessory carport". I had to wait until after I dropped off the new certificate for him to reject it for that reason... So another trip to the surveyor was required in order to get yet a new copy.


I put up my front door to make it look like someone could be living there. This was so that the insurance agent could take a picture for his records.


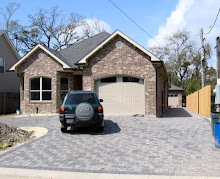
The driveway is done. And it looks great! We put up the wooden privacy fence between me and the neighbor who doesn't like me. I'm grateful for not having to always look right into their backyard anymore, and I'm sure they feel the same way. The privacy did bring other unwelcome visitors: someone tried to break into the back door this past Monday (3/9/09). I had left the house at 6pm on Sunday and came back at 10am on Monday. Someone had tried kicking in the door. The deadbolt held, but they bent and ruined the doorknob. I filed a police report, for what it's worth. I suspect it was people living or visiting across the street.


That lead to a renewed push to secure the backyard. This week was a mad dash to get all that done. We finsihed a gate in the alley on Wednesday. Thursday was a very busy day with the driveway gate being installed, Entergy arriving a day ahead of schedule to hookup my power to the house, the countertop guy coming to make final measurements, and the cabinet guy visiting to install the lazy susan in the kitchen!


That brings you up to date. I'll fill in more details when I have time. Here are some recent photos. The only things you can't see here are the front doors and the driveway gate. Enjoy!