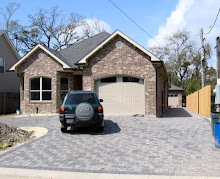
Tuesday, September 30, 2008

Colors, Colors, Everywhere!

Among other things this week, I've been narrowing down on the colors I want to use to paint the house. I have one question: just how many shades of beige and tan can there be?!

I've had a friend from church over to help me pick the first few colors. Now that I know what the finish on my cabinets should look like (a mid-to-dark cherry color), I'm ready to continue through the kitchen and the rest of the house. My mom's cousins also came over a week ago to give their input.

Everyone tells me that staying "neutral" is best because then you have a lot more leeway in how you decorate. By neutral, most people seem to mean beige or off-white colors. I'm okay with using colors that are "neutral" versions of themselves, like an earth tone color that's shifted toward the beige end of the spectrum. But I can't see painting every room in the house beige! Yeah, I know: you liven each room up with colored furniture and decoration. Okay. But it's hard for me to wrap my brain around that just now.

The local Helm Paint stores offer a service to come out and help you pick colors. It costs $35, but that get's credited toward your first purchase of paint. I arranged for her to come out on Saturday, and it was a good experience. She also pushed for a lot of beige, but I was able to steer a few colors slightly toward some other colors. Here's a snapshot of what we came up with:


Okay, alot of it is still beige. So leave me alone! :) The office and master bedroom colors actually look green when you see them on a wall. And the "sea haze" color in the master bath is a blue color. And even the alternative colors for some of these are (you guessed it) beige!

You can see my cabinet color in the kitchen part of the image above. The other insert in the kitchen are two countertop colors that might work well. I need to finalize the countertop and tile colors to finish out the selections.
Monday, September 22, 2008

News on Cabinets & Garage Doors

Cabinet Supplier Selected!

Over the weekend, my mom & I visited Wood-n-Things unfinished furniture in Gretna. I had met with a girl from this store at my house during the week, and I was impressed with her knowledge and attitude. She called me the next day with a price and I was definitely impressed with that since it was the lowest so far! And the visit to the shop confirmed that the work was up to par as well. So I've decided who will supply my cabinets!

It takes a lot to impress my mom. She's a perfectionist (even moreso than me) with a good eye for detail. But she was impressed with our visit. The quality of cabinets was good, and the people are helpful and down-to-earth. The owner offered to show us some of their work in progress, and we followed him a few blocks to his workshop where they were finishing some furniture.

They offer pre-made cabinets from a few places, but I'll be getting my cabinets custom built by a guy named Bruce in Dallas. Now that this is settled, I just need to figure out exactly how I want my cabinets configured. It turns out this is no small set of decisions either! Uggh... It never ends! :)

Garage Doors Ordered

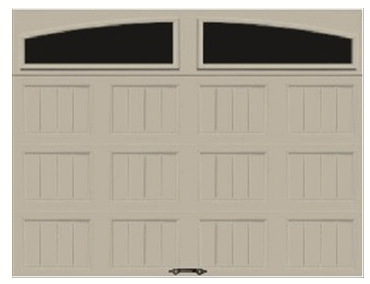
Another big step accomplished is that I ordered my garage doors today. Home Depot had a 15% off sale on Clopay doors. I got a traditional-looking door for the rear garage and something a bit more stylish for the front garage. The next step is for someone to come out to measure and inspect the site before they actually make and ship my doors. This was another decision that's been hanging over my head for a while, and it's a relief to get it done and move on. I need to finish hanging paneling around the door frame and finish the insides of the frames with Hardie board before the doors get put in. That should be in 2-4 weeks.


The front garage door


The back garage door


Paneling Progress

We spent this evening hanging more paneling in the back garage. Here are pictures from our work as of Saturday. As usual, I'm behind on pictures of what we did today, so a few more panels are up on the wall from what you see here:


Thursday, September 18, 2008

Garage Paneling Photo

Here's a picture of the paneling in progress for the back garage:


What you see here is where we left it on Tuesday night. we worked on it again tonight, but Murphy's Law kept us from making much more progress than what you see here.

Shower People, Paneling, Colors and Cabinets - Oh My!

So the owner from the shower place came out with another guy. They looked at it and reluctantly agreed to do more to get it better. He said it looked better than the original installation (which is true) and that you can only see the defect if you're standing right underneath it. Also true. However, I'm going to be standing right underneath it every time I take a shower. And it's still not acceptable. So they're supposed to deal with it when they come back to put on the last trim piece they've created. I also have to get the door put on. I hope I don't have problems with that also. At this point, I plan to go to the other man-made marble place in town for my bathtub alcove...

My Dad and I made good progress on Tuesday night putting the paneling up in the back garage. We finished most of one entire wall. The plywood sheets are laid horizontally, and with my 9ft ceilings, there are two full (4ft) sheets and an extra 1 ft to deal with at the top. We completed the two full layers. We're going back tonight and I'll get some pictures.

Like everything else, it's taking more time than I thought. If we could just slap each sheet up there and nail it, things would go fast. But we need to cut many of them so that two sheets will meet on the center of a stud. This allows you to nail the edge of both sheets. It's just time consuming, probably just because we aren't used to doing it. But the wall is coming out nicely. With the fluffy cellulose insulation behind it, there are some places where you can see a slight bulge outward.

My mom's cousin cleans houses. She got permission from the owner of one house for me to come and look at her wall colors. I did that yesterday. One room had the shade of green I'm really looking for. It's a but more muted than the avocado color I've been toying with. Most of the other walls were cream, off-white, or a light beige. I see the merit of using all very neutral colors so it's easy to match furniture and accessories later on. But I want to avoid a house that's all one blah color if I can. There's a happy mix in there somewhere.

On the cabinet front, I visited a woman's home who had cabinets done by my friend's cabinet guy in Hammond. They seemed to be built well, but she opted not to get the nicer drawer glides and hardware. Her cabinets were painted white with a fancy glaze. I prefer stained wood finish. She was very happy with the cabinet maker and the finished product. She said she's remodeled other houses and this guy was the best value by far. She had to drive to Hammond about three times during the process to see how it was coming and make design decisions.

I also met this week with someone from another local custom cabinet maker. She came out to the house to measure and talk about what I want. She had helpful suggestions to make and a women's perspective to contribute. I appreciated that. Her cabinets are made by a guy in Dallas, and they are finished at her shop before installation. She also measured for the office desk and the bathroom vanities. Today, she called with price of $8,463 for the kitchen, $2280 for the bathrooms, and $4,166 for the office. That's cheaper than the guy in Hammond (for the kitchen at least -- I didn't get the Hammond guy to quote the other rooms). I need to go to this local shop to get an idea of their work.

Tuesday, September 16, 2008

The Shower Adventure Continues & Office in 3D

I visited the man-made marble place today, but the owner wasn't in. He called a few minutes ago about meeting me at the house to look at it today. I asked him to call me when he's on his way.


In other news, here's a rough 3D mockup of what my office should eventually look like. I used the free Google Sketchup software to create it. I love that tool! The colors are a bit darker then what they will be. That's because I can't model lighting in Sketchup to make them look accurate. The tan rectangle on the right wall is my marker board. Rather than using a plain white dry erase board with the cheap, tacky aluminum frame, I hope to create my own glass board. This is just a sheet of glass mounted on the wall that you can write on just like the regular ones, but they are easier to clean (writing doesn't stick when it gets too dry). I've seen them with a color painted on the back of the glass (or a painted sheet of steel behind the glass so you can use magnets to stick stuff on the surface). The color can be used to match your room. I thought a nice beige color would complement the others.

First Painting Pictures!

Here are a couple of shots of the front garage now that it has paint on the walls and ceiling. The corner with no paint is where the utility sink will go. I'm going to glue a thin piece of veneer (like formica) on the walls here to make a backsplash. I want to glue to the primer instead of the paint.


Last night, my dad and I put the first piece of the plywood on the back garage wall as paneling. it's thin, smooth plywood made for this kind of thing. I'll have pictures of that project soon.

Friday, September 12, 2008

Painting Begins Today!

One of my next goals is to get my garage doors. Before they can be installed, I need to paint both garage ceilings and install some Hardie Board as trim over the exposed wooden beams inside the doorway.


So this week, I picked colors for the ceiling and the wall of the front garage (the back garage is getting stained plywood paneling). I bought the paint last night. Here's the palette:


I'm using a flat sheen on the ceilings and satin on the walls. The only accent I can think of will be the sheets of Formica veneer that I want to install on the walls where the utility sinks will be. This will serve as a backsplash to keep the walls from getting wet.


We're going to start this evening painting the back garage ceiling. I'm looking forward to this. To see color actually go on a wall will make it start to feel like a real house!

Shower Installation, Take Two

Early this week, the man-made marble company called to say that they were ready to come try again at getting the installation of the shower right. If you're following along at home, you may remember that the original installation was sloppy in some respects. Seems where two pieces of material met were uneven and details like that. They sent the same installer again. I called the owner when I found out he was coming back. He assured me that this guy was capable of fixing it.

I met the installer at the house. He looked at everything with me and made some excuses. The wall wasn't straight... Caulking is more of an art than a science, so he might not be able to make the job look better...

My parents had a new shower put in a few years ago from another company. Their house was built on a tight budget and there are alot of details that aren't perfect. I know their walls can't all be straight as a needle, and this other company did a very nice job making their shower look good. I spent two days checking studs and making them straight. Most of them were straight already. I can't imagine that each and every stud in my shower is skewed. And that's what I'd have to believe if I accepted what this guy had to say. I told him I expected him to try his best.

I left him to do his work. In the end, it does look better than before. But it isn't perfect. The bench seat looks ok now. He didn't touch the caulking, as far as I can tell. And the seam that was out of whack is closer to what it should be.

They still have to come back out and put one last piece on that he didn't have the right size for. I haven't decided how I want to proceed. I'll let my mom look at it and see if she thinks I need to protest some more.

Monday, September 8, 2008

Back Online After Gustav

The power was out from Monday until late Saturday. Meanwhile, houses all around our 2-3 block neighborhood never lost power at all! That was a bit frustrating.

But my house came out of the storm untouched. Everything was fine. Not even too many leaves and twigs to pick up. Before the storm, we had tied a rope from the portable toilet to both the temporary electric pole and the nearby utility pole. A neighbor across the street described how the wind had the toilet leaning over on one edge. Only the rope was keeping it from tipping over and blowing down the street! Then the wind changed direction, and the toilet went upright and slid against the temporary pole for the rest of the time.

Here's a picture of the street I'm building on after the storm:

The power on this street also went out during the storm. It came back on earlier than my parents' house. I think they were back in business on Thursday.


Right behind Gustav is Hurricane Ike. It looks like that storm will graze Louisiana and go into Texas at this point. We don't need another one coming here right now!

Monday, September 1, 2008

Spoke Too Soon

About 10 mins after my last post, the power went out! I'm posting this short msg from my mobile phone.

Gustav in Progress

So far, so good. The power is still on and although you can tell there's a hurricane outside, the winds haven't been dangerously excessive. I got about 5 hours sleep before the noise from outside distracted me too much. There's still about 4-5 hours to go until the storm's eye makes landfall, but we're optimistic now that we won't even lose power. That would make all the difference in the world! Even if we do lose power, it seems that everyone prepared so well for this event that the restoration effort wouldn't take weeks like it did after Katrina.


Here is a photo of the house with all the windows boarded up:


And here's one from Friday showing the primer sprayed on the walls and ceilings. You're looking in through the front door:


I'll write more later, assuming I still have power and communications.